Differentiation Made Easy:
Teaching with a Workshop Approach
Teaching with a Workshop Approach
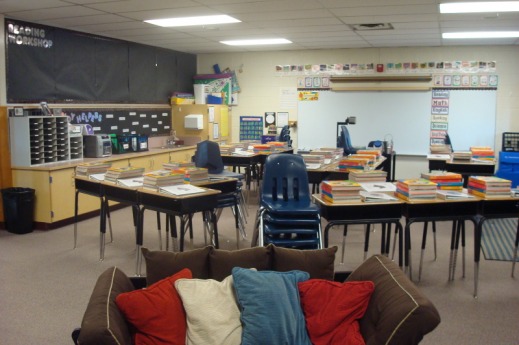
Classroom Set-Up
When the summer comes to a close teachers are thinking about back to school. The summer provides a time for reflection, not only about what we taught and how we can teach a topic better, but it also provides a time to reflect on how well our classroom space worked for us and our students. One thing we might not realize, but the way in which we set up a classroom and the things we put in it show everyone (parents, other teachers, your principal, and our students) what we value and care about and reflects our teaching beliefs and philosophy. The ideas listed here can be found in the book Designing Classrooms for Literacy: Spaces & Places by Debbie Diller. Also, I enjoyed watching this video clip for Boushey & Moser's DVD entitled "Simply Beautiful: Classroom Design for Gracious Living and Learning." It is a six minute video, but it full of good information and things to think about when setting up our classrooms. Click on this LINK and scroll to the bottom of the page to view the video. It changed the way I thought about my own classroom, and I am thankful for that!
1. Plan your space on paper
Plan for the space that matches the way you want to teach. If you've taught in the same room for many years or you are placed in a new classroom, you should think about the design of your classroom. Experts recommend that you place the desks and chairs in the space LAST, and put everything else in your classroom space FIRST. If you have shelves for a classroom library full of books, set those up in your classroom first, and let the desks fill in where there is space. The following things are what I think about in my plans:
Peter Walsh reminds us in this quote about our space, "The amount of space you have cannot be changed - the amount of stuff you have can."
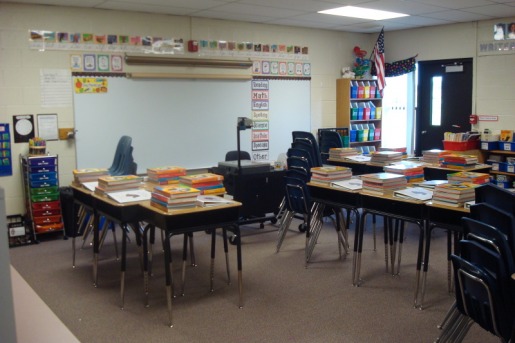
- Whole-Class Meeting Area (This includes my easel, rug, directors chair)
- Book Shelves for My Classroom Library
- My Bulletin Boards (My CAFE board, Homeworkopoly, 6 Traits Board, Writer's & Reader's Workshop, All About Me Board, etc.)
- Check In/Paper Work Area for Students
- Computers
- Materials/Supplies Set Up
- Desks/Tables
Peter Walsh reminds us in this quote about our space, "The amount of space you have cannot be changed - the amount of stuff you have can."
2. The teacher desk/shrine
Boushey & Moser call the teacher area of the classroom that takes up a lot of classroom space, the teacher shrine. When we are first setting up our classrooms or are not thinking about the best use of classroom space it is easy to create the teacher shrine. After all, we are important people. If you really want to free up some space in your classroom, think about putting your teacher desk against the wall, I did and it freed up a huge portion of my classroom. Think about it, you are one person in the classroom, and there needs to be enough space for all your students to spread out and use the space, too. Make sure your teacher space is organized, functional and can it be part of the teaching or learning space of the classroom. Mine is a part of the teaching space, because I can swing my chair around and teach a small group of students at the table.
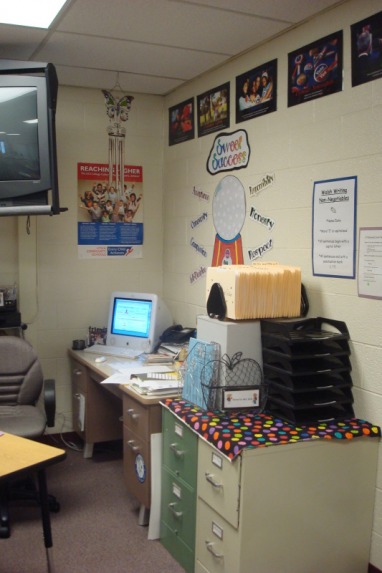
My new desk placement. I can use my teacher chair at my desk and at a small-group meeting area by swining it around!
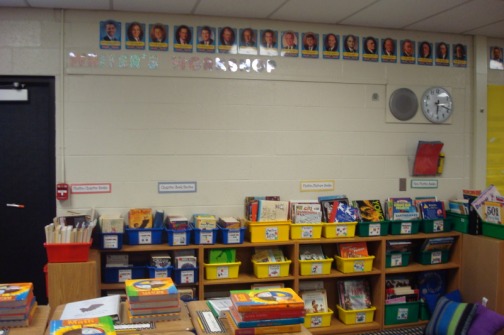
3. Classroom Library
Undoubtedly, we all have books for the students to use and read in our classroom. Don't neglect thinking about where you place your books and how you display them in your classroom. I have bins to hold different books on the shelves. In my classroom I dedicated one side of the classroom to the library, but I also had two shelves back-to-back that house encyclopedias and dictionaries in another classroom space. When you are planning your classroom library in your space, think about if you want all your books in one area or all throughout the space? How are you displaying your books?
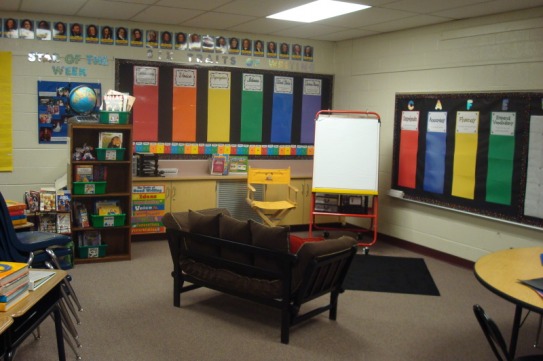
4. Whole Group Meeting Area
One of the important spaces in your classroom is a space for students to meet as a whole group for lessons. We shouldn't always teach our students from their desks, regardless of the grade level. To anchor your whole group meeting space place a rug in the area. It will really define that space. I have picked up rugs cheaply from WalMart and Aco Hardware, especially around back-to-school time for those college kids and their dorms. Pick something that goes with your room decor or what you like. Rugs also not only define a space for learning, but make the room cozy and homey feeling.
5. Computers
Mostly, we are bound to put computers in spots in our classroom where they can be plugged in to the wall and have a cord for the Internet access. Remember, you don't always have to put chairs at the computer spots in your room. You can always ask a janitor to remove the legs, and students can sit on the floor to work, or pull up a pillow to work if you keep the long legs on the tables.

Computer is covered with a sheet here, later in the year I added another computer, that faced the opposite way! So 2 computers in one small space.
6. Student Spaces
Now you can insert where your students will work. You need to decide if you want individual desks for each student or tables? Also, where are you going to house pillows for students to use when working around the room? Do you have comfy furniture that needs to be placed in the room? I put students in groups/clusters around the room and make them fit in where there is space. Also, where will you put chairs? Stack by each group or one space in the classroom?
7. Material Storage Spaces
Where in the classroom will students go to get various materials? I usually have a spot in the classroom that houses their individual book boxes. Then, there is an area that contains paper, scissors, glue, graph paper, stencils, rulers and calculators that they can access on their own. Also, don't forget the power of labels, not only do they help you but it also helps students to put things back in the correct place and find things without asking you where a certain material is. If you have younger students, you can still put a label with text, but I'd add a picture of what the material is. This will really help your ESL/ELL students, too.
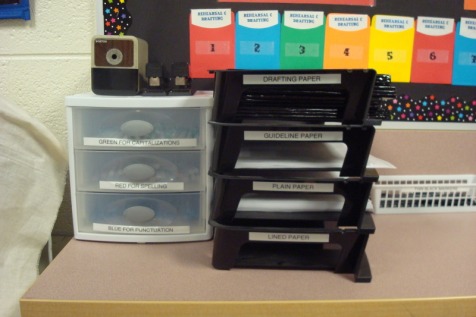
In my writer's workshop area I keep all the materials for book making, drafting and editing
8. Think about your walls
Are you a teacher who spent a ton of money on teacher store posters, inspirational sayings....need I go on? We all have. Really think about what you believe is essential for your students and take down or donate what you don't really need. Or, better yet, think about what a great learning tool it would be if you created something for the walls together. Or put up a teacher store item on your walls, after you've used it in a lesson. Research, and I have seen this too, shows that students don't really "see" what you purchased and put up on the walls, but if they made it or made it with the class and then you put it up on the wall, it gets used and is noticed. Maybe you'll think about creating a colors bulletin board, but have the kids that you currently teach help make it. It is really hard for us as teachers to have blank spaces on the walls when the school year begins. However, if you have everything up on the walls before the year starts it sends the message to the incoming students that the classroom is yours, when you leave places blank and you put up class created work and reference materials it becomes their classroom. I've begun to think, perhaps I shouldn't post the alphabet...couldn't we create that together as a cursive review at the beginning of the year? Then kids will really use it too, I can't tell you how many students will ask how to make a cursive "q" and I'll tell them to look at the alphabet that I have posted above the whiteboard that is used daily, and they say "oh yeah...I didn't realize that was there." That really makes you think about your walls.

This wall is blank at the beginning of the year, and gets filled throughout the year.
9. Bulletin Boards & Borders
My first few years of teaching each bulletin board used to have a different background color and a different themed border to go with whatever topic the bulletin board happened to be about. After I learned a little about classroom spaces and creating the best environment for learning, I realized that I was adding a lot of visual noise to the classroom. The only visual noise should be what the students have learned in the classroom. Now I pick one color and that is the background for all my bulletin boards. Also, I pick one border and that is the border for every bulletin board. Not only that, I pick one style of lettering for the bulletin board titles and that is what I use for all my boards. I use black for the background, and have a border with multicolored stars and white dots. My words are sparkle punch-out lettering.
Classroom Before
Classroom After


